<div class="slide">
	<h1>OpenURL</h1>
	[slide content goes here]
	<div class="handout">
	[any material that should appear in print but not on the slide]
	</div>
</div>
(See this slide in action)Several years ago, the renowned web-standards guru Eric Meyer created a simple, standards-based slide show system. For brevity's sake, he dubbed his work S5, and then he released it to the public domain. If you'd like to see a working example of an S5 slide show, check out Meyer's Introduction to S5 presentation.
Of course, it had long been possible to create series of linked pages to create a de-facto slide show; but Meyer used JavaScript to make a slide show in a single HTML file.
Creating slide shows using standard HTML has several advantages over proprietary formats like those produced by Microsoft's PowerPoint or Apple's KeyNote. An S5 slide show:
On the other hand, creating an S5 slide show is not a point-and-click proposition like its proprietary competitors. The remainder of this article will be a brief primer on the process of creating an S5 slide show. It will be helpful if you know HTML already, but that's not required.
We're going to create a small slide show using Meyer's S5 system, using a pre-existing blank. Make a local copy and follow along as you read.
You need a text editor. Here are some options:
All of these are open source software. If you don't like any of them, go find your own - there are about four zillion different text editors out there. Personally, I favor SciTE, with the UI tweaked to my preferred settings. I've made a Windows installer for my customized SciTE, which you can download if you like.
A WYSIWYG web page editor like Macromedia's Dreamweaver will also work; but these editors tend to insert extraneous code that might mess up the S5 scripting. If you want to use one of these, use the program's text editing mode rather than its visual editing mode.
You need a blank slide show to start with. Here's a copy.
You can also get a copy from Eric Meyer's S5 site if you prefer. You should note, however, that the version I've put together here has a couple of minor differences from his (changelog). For purposes of this primer, I'm going to assume you're using my version.
The blank show is zipped up. Once you've got it, unzip it. (In most operating systems, that means double-click the file and drag its contents where you want them.) It contains a folder called S5-1-1-blank. Once you've extracted it, you can rename this folder anything you like.
Inside S5-1-1-blank, you'll find an index.html and a sub-folder called ui. You can safely ignore everything in ui - those files are style sheets define the appearance of the slides and a JavaScript which runs the show. I'll talk about the style sheets briefly at the end of the primer, but for now the only file we care about is index.html.
The first step in creating your own slide show is to fill in some pre-defined details. Open index.html with your preferred text editor. If you're feeling confident, just go through and replace [anything in square brackets] with your own information, and then skip down to the Building Slides section.
The <head> sections of S5 files contain a few pieces of information about the slide show that aren't technically part of the slide show itself. It's easy to forget these, since they don't actually display in the document (with the exception of the <title>, which may be visible during your presentation depending on what browser you use). They do make it easier for search engines to index your slide show; it's good practice to fill them out. Let's start with the title of the HTML document.
Replace:<title>[slide show title here]</title>... with your own title. Thus:<title>OpenURL Opens New Horizons</title>
This defines the title of the HTML document. It will appear in the bar at the top of the web browser window, or in the tab if you're using a tabbed browser. Don't forget to change this; it may be visible during your presentation, and if you haven't changed it people may notice. Next, let's record the date of your presentation, your name, and the name of your organization:
Replace:<meta name="presdate" content="20061231" />... with the date of your presentation, in the format YYYYMMDD. I'm writing this on April ninth 2007, so:<meta name="presdate" content="20070409" />And these:<meta name="author" content="[name of author]" /><meta name="company" content="[name of company/organization]" />With your own information:<meta name="author" content="William Martin" /><meta name="company" content="UT Austin - School of Information" />
This information won't actually appear directly in your slide show, but having it there makes it easier for search engines to index your page. A limitation of S5 is that there's no good way to specify multiple authors in the document's metadata. On the other hand, it's entirely possible to leave these sections blank or even remove them completely; their presence or absence won't alter the functioning of the slide show.
Be sure to get the <title> at least, since this may be visible during your presentation. Leave everything else in the <head> section alone. The rest of it just links to all the CSS and JavaScript files that run the show.
Here's the first chunk of code in the <body>:
<div class="layout"><div id="controls"><!-- DO NOT EDIT --></div><div id="currentSlide"><!-- DO NOT EDIT --></div><div id="header"></div><div id="footer"><h1>[location/date of presentation]</h1><h2>[slide show title here]</h2></div></div>
This code defines the layout of the slide show. You don't need to worry about most of it. Leave it alone, except for filling in the details in the "footer" section:
<div class="layout"><div id="controls"><!-- DO NOT EDIT --></div><div id="currentSlide"><!-- DO NOT EDIT --></div><div id="header"></div><div id="footer"><h1>Your Computer :: Right Now</h1><h2>OpenURL Opens New Horizons</h2></div></div>
The footer is visible on every slide in your slide show. You can actually put anything you like in the footer - [location/date of presentation] and [slide show title here] are just suggestions. Replace them with whatever you want to be visible on every slide. You can add extra HTML to this section as well, but be aware that it might cause formatting problems.
It may seem slightly odd to have the "footer" so close to the actual top of the document. The reason is that the actual slides are suppressed. They never appear in the document until they get swapped into place later by JavaScript, so this first chunk is the only one that actually gets displayed directly.
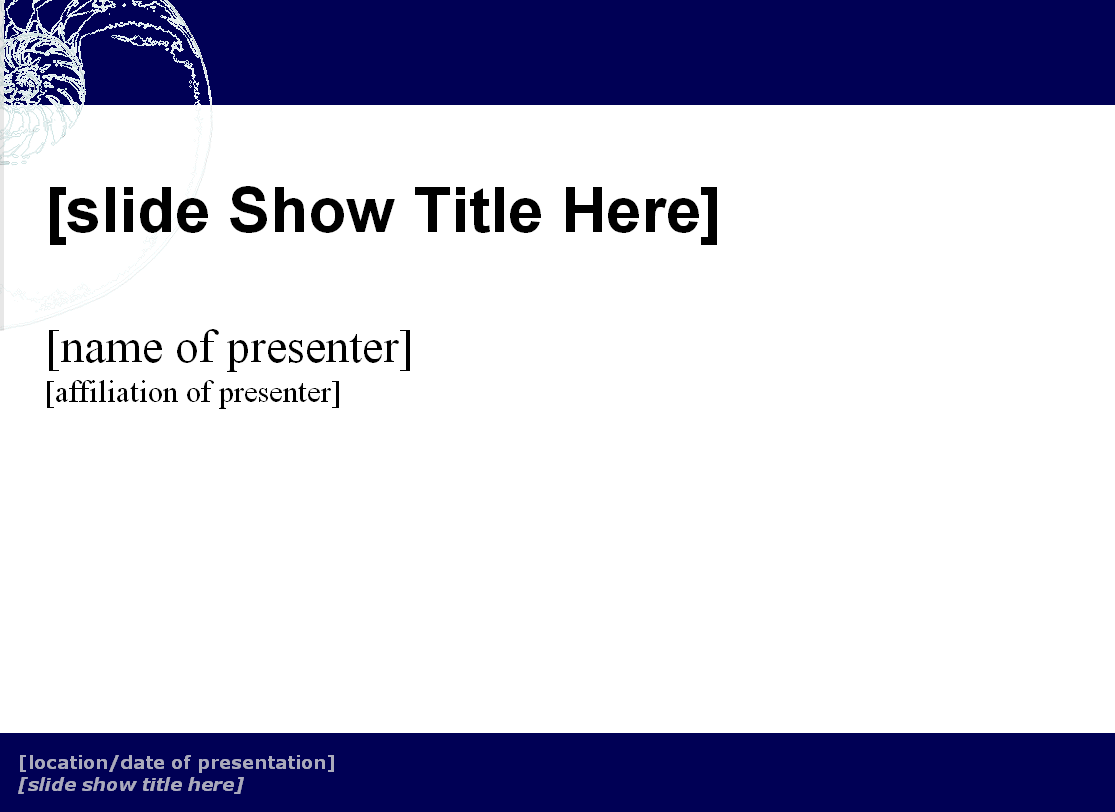
The first slide consists of pre-defined fields like those we've been editing so far. Here's the code:
<div class="slide"><h1>[slide show title here]</h1><h3>[name of presenter]</h3><h4>[affiliation of presenter]</h4></div>
This code defines the first slide; when you initially load the presentation, this is the information you'll see. Again, in this case these values are only suggested. You can fill in whatever you'd like. You can also use arbitrary HTML here, and do so much more easily than in the footer - there's more space. For now, let's just plug in some values:
<div class="slide"><h1>OpenURL Opens New Horizons</h1><h3>William Martin</h3><h4>UT Austin - School of Information</h4></div>
As you've no doubt noticed, a lot of this duplicates information from earlier in the file. The difference is that now the code we're editing will actually be visible to the audience. In fact, at this point we have completed the initial slide. If you'd like, you can see it in action before we move on.
Now we come to the most important part: building your own slides. That's the whole point, after all. All the slides use the same basic code:
<div class="slide"><h1>[slide title]</h1>[slide content goes here]<div class="handout"> [any material that should appear in print but not on the slide] </div></div>
Copy and paste this block of code as many times as you like. Each new occurrence is a new slide. If you're like me, you probably don't know exactly how many slides you'll want in a given show when you start. I tend to paste five or so, and then when I've filled in all but the last one I paste another five. When I'm done, I just delete any unused slides.
The <h1> tag (heading, level 1 importance) will be your slide title. Fill in whatever you'd like there. Thus:
<div class="slide"><h1>OpenURL</h1>[slide content goes here]<div class="handout"> [any material that should appear in print but not on the slide] </div></div>(See this slide in action)
The slide will then display the phrase "OpenURL" as the title of the slide.
The next step, naturally, is to add some content to the slide. Most slides take the form of bulleted or numbered lists, which are dead easy to do in HTML. Thus:
<div class="slide"><h1>OpenURL</h1><ul><li>A special URL for requesting specific materials from a library</li><li>Widely used by academic libraries</li><li>Less common in public libraries</li><li>Defined in NISO Standard Z39.88</li></ul><div class="handout"> [any material that should appear in print but not on the slide] </div></div>(See this slide in action)
The <ul> tag is an abbreviation for Unordered List. As you might expect, it creates an unordered list. Each of the <li> tags inside it defines a List Item. When a web browser renders this code, it will be displayed as an indented list, with a bullet by each item in the list. You can also make numbered lists. Numbered lists are identical, except that you use <ol> (for Ordered List) instead of <ul>. When I'm making a slide show, I often build an empty list with three or four items into the first slide before I paste it a bunch of times. If you do that, just don't forget to remove any un-used bullets! There's nothing more embarrassing that realizing you've got an empty bullet you forgot to delete in the middle of a presentation.
If you need sub-points, just put a new list inside an existing list item. Thus:
<div class="slide"><h1>OpenURL</h1><ul><li>A special URL for requesting specific materials from a library<ul><li>Widely used by academic libraries</li><li>Less common in public libraries</li></ul></li><li>Defined in NISO Standard Z39.88</li></ul><div class="handout"> [any material that should appear in print but not on the slide] </div></div>(See this slide in action)
You can use any many levels of bullet points as you'd like, but it's probably best to use sub-bullets sparingly, because too many levels can make it harder to interpret the information in the slide.
At this point, you already have a fully functional slide, and you might well move on to your next one. For the sake of illustration, though, let's suppose you decide that your list needs an introductory phrase. Adding one is simple. Thus:
<div class="slide"><h1>OpenURL</h1><p>OpenURL is:</p><ul><li>A special URL for requesting specific materials from a library</li><li>Widely used by academic libraries</li><li>Less common in public libraries</li><li>Defined in NISO Standard Z39.88</li></ul><div class="handout"> [any material that should appear in print but not on the slide] </div></div>(See this slide in action)
Here we've just added a <p>aragraph tag with our introductory text. Next we might add a link. Thus:
<div class="slide"><h1>OpenURL</h1><p>OpenURL is:</p><ul><li>A special URL for requesting specific materials from a library</li><li>Widely used by academic libraries</li><li>Less common in public libraries</li><li>Defined inNISO Standard Z39.88<a href="http://www.niso.org/standards/standard_detail.cfm?std_id=783">
</a></li></ul><div class="handout"> [any material that should appear in print but not on the slide] </div></div>(See this slide in action)
You can use this link in the course of your presentation, but open it in a new tab or window, otherwise you'll lose your place in the presentation. It also raises a problem - what if somebody wants to print this out? They won't get the address for that link. Fortunately, we can use the last section of the slide to recover from that problem, thus:
<div class="slide"><h1>OpenURL</h1><p>OpenURL is:</p><ul><li>A special URL for requesting specific materials from a library</li><li>Widely used by academic libraries</li><li>Less common in public libraries</li><li>Defined in<a href="http://www.niso.org/standards/standard_detail.cfm?std_id=783">NISO Standard Z39.88</a></li></ul><div class="handout">You can get the Z39.88 standard at:<br />http://www.niso.org/standards/standard_detail.cfm?std_id=783</p></div></div>(See this slide in action)
The information you put in the "handout" section of each slide will not appear on the screen, but will print out. If you want to see it on screen, move your mouse to the bottom right corner of the slide show and click the ∅ symbol. That will "turn off" the slide show, and let you see a "print" version of the slide show. You can restore the slide show formatting by clicking the ∅ again (it'll be in the upper right-hand corner this time). If you turn off the styles, the formatting may be messed up when you turn them back on - so don't do this in the middle of your presentation if you can help it!
If you want to print out your whole slide show and hand it out to people, this is an extremely useful feature. But it's also optional. You can entirely omit the handout section, thus:
<div class="slide"><h1>OpenURL</h1><p>OpenURL is:</p><ul><li>A special URL for requesting specific materials from a library</li><li>Widely used by academic libraries</li><li>Less common in public libraries</li><li>Defined in<a href="http://www.niso.org/standards/standard_detail.cfm?std_id=783">NISO Standard Z39.88</a></li></ul><!-- Look ma, no handout! --></div>(See this slide in action)
This version of the slide will work just as well, it just doesn't have any "extra" information if the slide show gets printed. For the sake of brevity, I'll omit the handout section in future code examples.
Visual aids like diagrams are one of the most sensible uses of a slide show. Naturally, you can link to images just as in any other HTML document. Thus:
<div class="slide"><h1>OpenURL Topology</h1><img src="topology.gif" width="640" height="396" alt="OpenURL topology diagram" /><p>Diagram from Van de Sompel & Beit-Arie, D-Lib Magazine, Mar 2001</p></div>(See this slide in action)
The <img> tag links to an image file. Here, I've assumed that topology.gif is in the same directory as the slideshow, has a width of 640 pixels, and a height of 396 pixels. The "alt" attribute specifies some replacement text that will be used if the image fails to load for some reason.
The alt text also serves another purpose: accessibility. Screen reading software will recite that text aloud to any blind user who opens this slide show. Don't omit the alt text - it's important. One of S5's greatest advantages is that a blind user can access it easily; a screen reader will just read through the HTML regardless of whether it's visible or not, so the listener hears the slides read aloud in order. Don't undermine that accessibility by failing to specify alt text for your images.
There are a couple of things to keep in mind when embedding images. First, they slow down page loading. If you have a LOT of them, they can slow it down considerably, and you can't use your slide show until everything is completely loaded. This isn't an issue if you're opening a copy you keep on a thumbdrive or a hard drive, but if you've put your slide show on a web server it can be an issue. In fact, in most cases it's not going to make a big difference even if you are accessing the show over the web. Just don't make a 4.5 megabyte S5 slide show with 87 images unless you can access it from a local disk.
Also, if you use an image with dimensions larger than the available screen area, parts of it will get cut off. Your home computer may have a screen resolution of 1600x1200 pixels, but the computer where you actually give your presentation might be limited to 1024x768. In the OpenURL topology example I've used here, the picture itself displays fine at 1024x768 - but the paragraph crediting the authors gets cut off. Err on the side of caution - use small images, and if you can find out how large the screen you'll be presenting on is. If you really need a full size image, put a smaller one in your slide show and then link to a larger version so you can open up a new window with the big version.
This is probably the coolest feature in S5: you can embed complete, live web pages in your slide show. All it requires is an <object> tag, like this:
<div class="slide"><h1>Google Scholar uses OpenURL</h1><p>A web page at<a href="http://scholar.google.com/">http://scholar.google.com/</a></p></object></div>(See this slide in action)
The <object> tag loads an external file into a specified portion of the screen. It's usually used to embed Flash movies and other types of media that require an extra plug-in to work. By specifying the "type" attribute as "text/html", however, it simply treats the file as a web page. That is, it marks out a chunk of the screen and treats it as a frame containing a whole separate web page. It's good practice to include some text inside the tag - this is like "alt" text, and will never be seen unless the web page fails to load. If you'd like, you can use screenshot of the web page here so that if the live page doesn't load, you'll still have a picture to show. And, as you can tell, you can specify the width and height of the frame (in pixels). Lastly, the "style" attribute I've specified here creates a black border around the object, one pixel wide. If you don't specify this, then there won't be any border marking the limit of the embedded page.
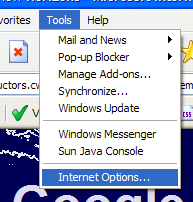
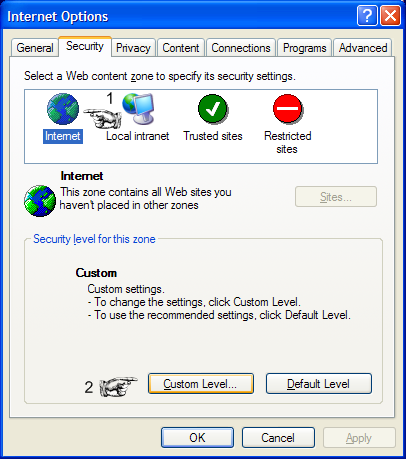
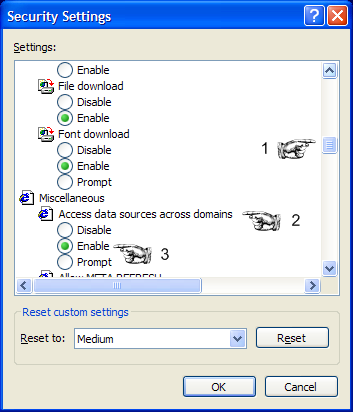
If you're going to be doing your presentation using Internet Explorer, and you have embedded a web page, you will need to alter the IE security settings to allow it to download the web page you've embedded.
Your presentation should now work as expected.
There are some provisos you need to keep in mind.
There's another, more common way to embed one web page in another: the <iframe> tag. Avoid this in your S5 shows. It causes all kinds of problems. In Internet Explorer, portions of the linked web page will wind up smeared over every other slide in the show.
In Firefox version 2.0.0.1 and higher, <iframe> tags do not work inside S5 slide shows. The content will load, but it won't display. That is, the web browser will download the HTML for the embedded page, but the frame will remain blank. This appears to be a side-effect of some security measures intended to prevent people from loading malicious code into hidden frames. I have filed a bug with the Firefox developers.
The <iframe> tag appears to work with S5 in Opera, Safari, and in Firefox version 2.0.0.0 (or lower). Even so, it's safer to go with the <object> tag instead.
If you embed a web page, check to see if works before you begin your presentation..
Anything that you can do with HTML, you can do to an S5 slide. The slides inherit all the limitations of HTML, but also all their flexibility. Go experiment! You can embed Flash movies, or animated GIFs, or even create slide shows whose contents get updated by a server-side script. Go play!
By this time you've got a handle on creating slides. But the default appearance of the slides are pretty dull. Blue header, blue footer, white content area, and spiral shell logo in the upper left corner. Boring! Thankfully, it's completely possible to change the appearance of an S5 slide show.
Doing so, however, requires a thorough working knowledge of Cascading Style Sheets (CSS), which is well beyond the scope of this tutorial. All is not lost, however; there are a variety of pre-made themes that you can download. I'll demonstrate using a theme I created, called "Mitaine." This theme was created using illustrations from an obscure 19th century children's novel, Croquemitaine by Ernest Louis Victor Jules L'Épine. Gustave Doré executed the illustrations. I created it for a presentation I made on the novel in a class on graphic design and literature. Download a copy of the theme files for Mitaine now.
Inside mitaine-theme.zip you'll find a folder called mitaine. Extract that from the ZIP file, and drop it into the ui folder of your show.
Your presentation folder should now contain the following files and folders:
There are two types of files in mitaine and ui: image files (with extensions like PNG, JPG, and GIF) and CSS files. Oh, and there's also an HTC file in ui - that's a file for correcting an annoying bug in Internet Explorer. Leave it be. You can also ignore the image files. They're referred to in the CSS files, which are what we're concerned with here.
If you study these lists, you'll note that several CSS files in the mitaine folder have the same names as files in the default folder. The ones in mitaine are going to supplant the ones in default. But don't delete the ones in default. Not yet, anyway. Leave them there as a fallback in case you make a mistake. We can clean them out later, or even leave them there (they won't cause any problems just sitting there).
Let's go back to index.html. In the <head> section you'll find several links to CSS files. Here they are, with the relevant portions in blue:
<link rel="stylesheet" href="ui/default/slides.css" type="text/css" media="projection" id="slideProj" /><link rel="stylesheet" href="ui/default/outline.css" type="text/css" media="screen" id="outlineStyle" /><link rel="stylesheet" href="ui/default/print.css" type="text/css" media="print" id="slidePrint" /><link rel="stylesheet" href="ui/default/opera.css" type="text/css" media="projection" id="operaFix" />
You may be surprised to note that the HTML file doesn't actually refer to three of the CSS files. There aren't any links to framing.css, s5-core.css, or slides.css in the HTML. The reason for this is that slides.css links to those three files. Here's the code inside slides.css:
@import url(s5-core.css);/* required to make the slide show run at all */@import url(framing.css);/* sets basic placement and size of slide components */@import url(pretty.css);/* stuff that makes the slides look better than blah */
Ah! So slides.css covers all four of the CSS files in mitaine. All we need to do is point the slides.css link in the HTML to the copy in mitaine instead of ui. Thus:
Replace:<link rel="stylesheet" href="ui/default/slides.css" type="text/css" media="projection" id="slideProj" />With:<link rel="stylesheet" href="ui/mitaine/slides.css" type="text/css" media="projection" id="slideProj" />
S5 themes rarely alter the other three stylesheets, outline.css, print.css, and opera.css. However, if you've found a theme on the Internet, be sure to check whether these files were provided. If so, be sure to link to the theme's version. Occasionally, you'll find advanced theme authors who have also supplied a modified version of slides.js. If this is the case, be sure to link to it instead of the default version - just change the "href" attribute of the <script> tag to point to the theme's version of the file.
In rare instances, you'll come across an author who added extra HTML to the slide show file. Two of the themes below, Glossdeck and Ultraviolet, do this. If you're installing a theme and it's not working quite right, study the author's example slide show to see if there's any unusual HTML in the slide show.
Lastly, be aware that there have been two major versions of S5. Version 1.0 and 1.1 have some significant differences. If you have a theme that was designed for use with S5 1.0, it may work erratically or not at all in S5 1.1. (If you really need a copy of a blank S5 1.0 slide show, you can download one here).
Installing a theme for S5 can range from dead easy (just changing the slides.css link) to quite difficult. If possible, see if the author has provided a pre-configured blank slide show. That way you can forget about the theme configuration stuff and get straight on with creating your slide show. If you do choose to install a theme, do yourself a favor and save a blank copy for yourself so that you won't have to do that part twice.
With that in mind, take a look at the theme gallery.
The following themes are pre-configured and ready to go. No need to worry about theme configuration; just download the ZIP file containing your chosen theme, and you can immediately begin making slides.
I have made minor modifications to a few of these themes (see Changelog). The themes are organized by creator, and alphabetically within author. Each theme has a screenshot and a live demo. All of them use S5 1.1.
| Creator: | Eric A. Meyer |
|---|---|
| Web Site: | meyerweb.com |
| Live Demo: | View a live demo of this theme |
| Download: | Download pre-configured blank show |
| Creator: | John Manoogian III |
|---|---|
| Web Site: | blog.jm3.net |
| Live Demo: | View a live demo of this theme |
| Download: | Download pre-configured blank show |
| Creator: | William Martin |
|---|---|
| Web Site: | This is the web site for this theme. |
| Live Demo: | View a live demo of this theme |
| Download: | Download pre-configured blank show |
| Creator: | William Martin |
|---|---|
| Web Site: | This is the web site for this theme. Theme based on an illustration of Perseus riding Pegaus by Mary Hamilton Frye, printed in the 1914 edition of "Myths Every Child Should Know." The illustration is now in the public domain. |
| Live Demo: | View a live demo of this theme |
| Download: | Download pre-configured blank show |
| Creator: | Martin Hense |
|---|---|
| Web Site: | yatil.de/s5 (German) |
| Live Demo: | View a live demo of this theme |
| Download: | Download pre-configured blank show |
| Creator: | Martin Hense |
|---|---|
| Web Site: | yatil.de/s5 (German) |
| Live Demo: | View a live demo of this theme |
| Download: | Download pre-configured blank show |
| Creator: | Martin Hense |
|---|---|
| Web Site: | yatil.de/s5 (German) |
| Live Demo: | View a live demo of this theme |
| Download: | Download pre-configured blank show |
| Creator: | Martin Hense |
|---|---|
| Web Site: | yatil.de/s5 (German) |
| Live Demo: | View a live demo of this theme |
| Download: | Download pre-configured blank show |
| Creator: | Jesús David |
|---|---|
| Web Site: | jesusda.com (Spanish) |
| Live Demo: | View a live demo of this theme |
| Download: | Download pre-configured blank show |
| Creator: | Jesús David |
|---|---|
| Web Site: | jesusda.com (Spanish) |
| Live Demo: | View a live demo of this theme |
| Download: | Download pre-configured blank show |
| Creator: | Jesús David |
|---|---|
| Web Site: | jesusda.com (Spanish) |
| Live Demo: | View a live demo of this theme |
| Download: | Download pre-configured blank show |

| Creator: | Jesús David |
|---|---|
| Web Site: | jesusda.com (Spanish) |
| Live Demo: | View a live demo of this theme |
| Download: | Download pre-configured blank show |
| Creator: | Jesús David |
|---|---|
| Web Site: | jesusda.com (Spanish) |
| Live Demo: | View a live demo of this theme |
| Download: | Download pre-configured blank show |
| Creator: | Jesús David |
|---|---|
| Web Site: | jesusda.com (Spanish) |
| Live Demo: | View a live demo of this theme |
| Download: | Download pre-configured blank show |
That about does it, I think. Using S5 requires a certain amount of willingness to deal with HTML, but that can range. If all you want to do is make some slides, and you're happy with one of the pre-configured themes here, then this primer should cover basically everything you might need to know. If you have the knowledge and the inclination, though, you can dive in as deep as you like: create a whole new theme for yourself, or even alter the functionality of S5 itself. All the code is right there, and you have permission to do anything you want with it. The only limits are your imagination - and, of course, the non-trivial task of writing code that makes all the major web browsers play nice.
Enjoy!
<iframe> issue: https://bugzilla.mozilla.org/show_bug.cgi?id=376900<iframe> tag.<head> of the blank slide show linking to his "fav icons."<img> at the bottom of the blank slide show, as in Manoogian's own code.